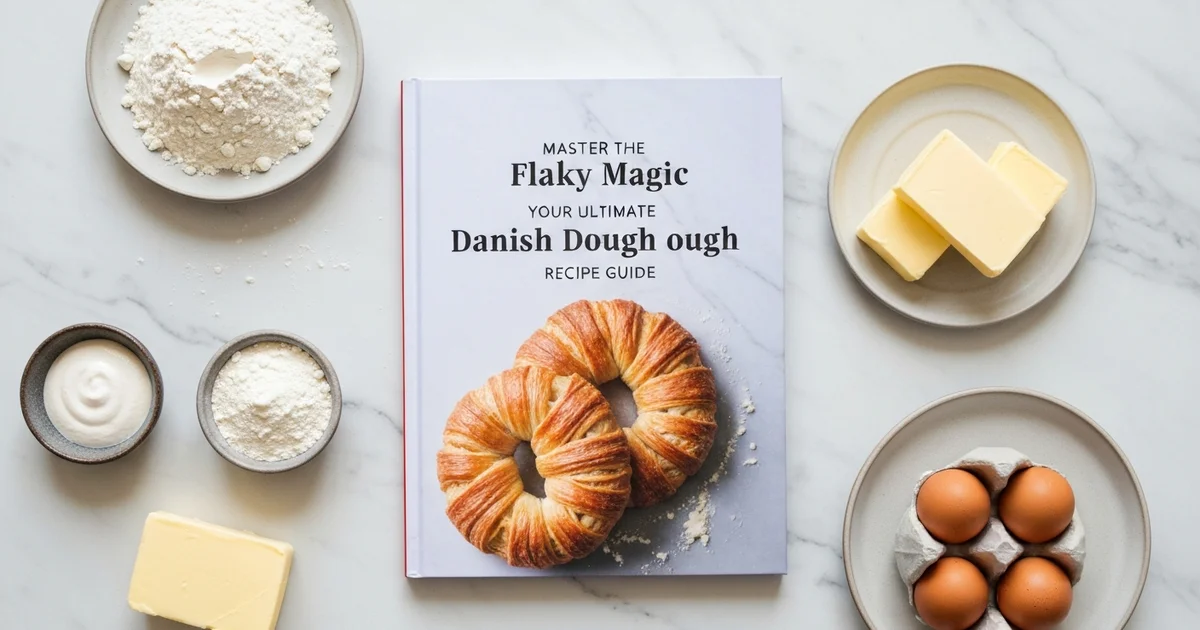
Unlock Flaky Magic: Danish Dough Perfected
Unlock the secrets to a perfect danish dough recipe! Learn to make flaky, rich pastries from scratch with our easy-to-follow guide and expert tips.
- 1Unveiling the Art of Danish Dough: A Journey into European Pastry
- 2The Irresistible Allure: Why This Danish Dough Recipe Stands Out
- 3Essential Ingredients for a Flawless Danish Dough: From Flour to Flavor
- 4Gearing Up: Essential Equipment for Mastering Your Danish Dough
- 5Your Guide to Flaky Perfection: Step-by-Step Danish Dough Recipe
- 6Achieving Danish Dough Excellence: Expert Pro Tips & Tricks
Ingredients
For the Dough
- 1 cup whole milk (lukewarm (240ml))
- 2.25 teaspoons instant yeast (1 packet)
- 0.25 cup granulated sugar (50g)
- 1 teaspoon salt
- 1 large egg (room temperature)
- 3 cups bread flour (360g, high-protein)
- 4 tablespoons unsalted butter (melted and cooled (56g))
For the Butter Slab
- 1 cup unsalted butter (very cold (226g))
For Egg Wash
- 1 large egg
- 1 tablespoon water or milk
Optional Fillings & Toppings
- to taste cream cheese filling (cream cheese, sugar, vanilla)
- to taste fruit preserves (raspberry, apricot)
- to taste almond paste
- to taste cinnamon sugar
- to taste powdered sugar glaze
Instructions
Activate the Yeast
In the bowl of a stand mixer, combine the lukewarm whole milk, instant yeast, and 1 tablespoon of the granulated sugar. Stir gently and let stand for 5-10 minutes, until foamy.
Combine Dry Ingredients
In a separate bowl, whisk together the remaining granulated sugar, salt, and bread flour. Add this mixture to the yeast mixture in the stand mixer bowl.
Mix and Knead the Dough
Add the large egg and melted, cooled unsalted butter to the mixer bowl. Using a dough hook attachment, knead on low speed for 8-10 minutes, until the dough is smooth, elastic, and pulls away from the sides of the bowl. If the dough is too sticky, add a teaspoon of flour at a time.
First Proofing & Chilling
Lightly oil a large bowl. Transfer the kneaded dough to the oiled bowl, turning once to coat. Cover the bowl with plastic wrap or a damp cloth and let it proof at room temperature until doubled in size (approximately 1-1.5 hours). Once doubled, gently deflate the dough and chill it in the refrigerator for 30 minutes.
Prepare the Butter Slab
While the dough chills, prepare the butter slab. Place the very cold 1 cup (226g) unsalted butter between two sheets of parchment paper. Using a rolling pin, flatten the butter into an even 8x8 inch (20x20 cm) square. Return the butter slab to the refrigerator to keep it very cold.
Enclose the Butter
On a lightly floured surface, roll out the chilled dough into a 16x8 inch (40x20 cm) rectangle. Place the cold butter slab onto one half of the dough, leaving a 1-inch border around the edges. Fold the other half of the dough over the butter slab, sealing all edges firmly to completely enclose the butter.
First Lamination Turn
Gently roll the dough package into a 16x8 inch (40x20 cm) rectangle. Perform the first 'turn' by folding the dough into thirds, like a business letter. Wrap the folded dough tightly in plastic wrap and chill in the refrigerator for 30 minutes.
Complete Lamination Turns
Repeat the rolling, folding into thirds, and chilling process two more times, for a total of three 'turns'. Each time, rotate the dough 90 degrees before rolling to ensure even lamination. Ensure the dough is well-chilled for 30 minutes after each turn.
Final Chill
After the third and final turn, wrap the dough tightly in plastic wrap and chill it in the refrigerator for at least 1 hour, or preferably overnight (up to 24 hours). This allows the gluten to relax and the butter to fully firm up.
Shape the Danish Pastries
On a lightly floured surface, roll out the thoroughly chilled dough to your desired thickness (typically 1/8 to 1/4 inch or 3-6mm). Cut the dough into desired shapes (e.g., squares, triangles, pinwheels) and add your chosen fillings.
Second Proofing
Arrange the shaped danishes on baking sheets lined with parchment paper, leaving space between them. Cover them lightly with plastic wrap or a clean kitchen towel and let them proof at room temperature until visibly puffy and slightly increased in size (approximately 45-60 minutes). This can take longer in a cooler environment.
Preheat and Prepare for Baking
Preheat your oven to 400°F (200°C). Prepare the egg wash by whisking together 1 large egg with 1 tablespoon of water or milk. Gently brush the tops of the proofed danishes with the egg wash.
Bake the Danish
Bake the danishes in the preheated oven for 15-20 minutes, or until they are puffed, golden brown, and cooked through. Baking time may vary depending on the size and thickness of your danishes.
Cool and Finish
Remove the danishes from the oven and cool them on a wire rack for a few minutes. While still warm, you may glaze them with a powdered sugar glaze or add any other desired toppings. Serve warm or at room temperature.
Equipment You'll Need
Here's what I use to make this recipe perfectly every time:
- Rolling Pin — Essential for precisely rolling out the dough and the butter block to achieve the characteristic flaky layers of Danish pastry. → Buy Now
- Large Mixing Bowl — Provides ample space to comfortably combine the initial dough ingredients and is often used for the bulk fermentation and chilling stages. → Buy Now
- Bench Scraper — Ideal for cleanly dividing the dough into portions, tidying your work surface, and helping to lift and fold the delicate dough. → Buy Now
- Baking Sheets — Necessary for baking the shaped Danish pastries evenly, allowing proper air circulation for a golden-brown crust. → Buy Now
- Plastic Wrap — Crucial for tightly covering the dough during chilling periods between folds to prevent it from drying out and forming a skin. → Buy Now
Recipe FAQs
How long should I proof my danish dough, and what if my dough isn't rising?
Can I use active dry yeast instead of instant yeast in this danish dough recipe?
What's the best type of flour for a flaky danish dough, and can I use all-purpose flour?
What's the ideal baking temperature for danish pastries?
Can I make a gluten-free danish dough?
How long can I refrigerate my prepared danish dough before baking?
Unlock Flaky Magic: Danish Dough Perfected
Unlock the secrets to a perfect danish dough recipe! Learn to make flaky, rich pastries from scratch with our easy-to-follow guide and expert tips.
Prep Time
60 min
Cook Time
18 min
Total Time
78 min
For the Dough
- 1 cup whole milk (lukewarm (240ml))
- 2.25 teaspoons instant yeast (1 packet)
- 0.25 cup granulated sugar (50g)
- 1 teaspoon salt
- 1 large egg (room temperature)
- 3 cups bread flour (360g, high-protein)
- 4 tablespoons unsalted butter (melted and cooled (56g))
For the Butter Slab
- 1 cup unsalted butter (very cold (226g))
For Egg Wash
- 1 large egg
- 1 tablespoon water or milk
Optional Fillings & Toppings
- to taste cream cheese filling (cream cheese, sugar, vanilla)
- to taste fruit preserves (raspberry, apricot)
- to taste almond paste
- to taste cinnamon sugar
- to taste powdered sugar glaze
Unveiling the Art of Danish Dough: A Journey into European Pastry
There’s something truly magical about the aroma of freshly baked pastries filling your home. This sensory experience instantly transports you. Today, we’re diving deep into the world of danish dough, a classic European laminated pastry.
Here’s the thing: this versatile pastry dough isn’t just for breakfast treats. It adapts beautifully, much like a pizza dough recipe using 00 flour. That foundational dough can transform into countless dishes. You can create numerous sweet fillings or even creative savory applications with this base.
Many home bakers perceive laminated doughs as daunting. Trust me on this one, the process is incredibly rewarding. My guide simplifies each step for home cooks, making it accessible.
What I love about this journey is creating bakery-quality pastries from scratch. You’ll notice that the golden brown edges and delicate layers far surpass store-bought options. Mastering this danish dough recipe is a valuable skill for any aspiring baker.
The Irresistible Allure: Why This Danish Dough Recipe Stands Out
There’s a unique magic in creating layered pastries from scratch, and this particular danish dough recipe elevates that experience, promising consistent, bakery-quality results right in your home kitchen. What truly sets this approach apart is its unwavering reliability in achieving that coveted, delicate, and airy lamination. While many recipes aim for flakiness, ours is meticulously designed to deliver it every time, yielding those beautiful golden-brown edges and a feather-light texture that you can truly see and taste.
Beyond its dependable performance, the versatility of this danish dough recipe is a game-changer. It’s not just for classic sweet treats; this rich, adaptable base opens up a world of culinary exploration. Imagine crafting elegant fruit danishes bursting with seasonal berries, or preparing luxurious cream cheese delights with a delicate hint of lemon zest. But don’t stop there—this dough excels in innovative savory applications too, from flaky mini sausage rolls to sophisticated herb-infused pastry bites, perfect for appetizers.
Choosing to make your Danish dough from scratch grants you unparalleled control and a significant upgrade in flavor and texture. You gain complete mastery over your ingredients, opting for the finest quality and fresh components, which consistently surpasses anything pre-made or frozen. This also means you can tailor it to personal preferences or dietary needs, adjusting sugar levels or exploring lower sodium options, ensuring a pastry that’s not only delicious but also aligned with your choices.
The process itself, though it calls for patience, is deeply rewarding. Embarking on this culinary journey means you’re not just following steps; you’re developing a deeper understanding of complex baking techniques, from optimal dough consistency for lamination to the critical role of temperature. You’ll cultivate valuable skills, building confidence with every fold and proof. The ultimate reward is a vibrant, fresh pastry, with subtle butter notes and an incredibly tender crumb, a true testament to your efforts and a taste of homemade perfection. This isn’t just a recipe; it’s an adventure in mastery, unlocking endless possibilities for your future baking endeavors.
Essential Ingredients for a Flawless Danish Dough: From Flour to Flavor
Crafting danish dough recipe begins with understanding each ingredient’s specific contribution. In my kitchen, I always approach ingredients with intention, recognizing their unique roles. This ensures the foundational dough develops its characteristic flaky texture and rich flavor.
Here’s the thing: selecting the right components makes all the difference in achieving bakery-quality results.
- Flour: I always recommend a high-protein bread flour for this recipe. Specifically, King Arthur Unbleached Bread Flour provides the necessary gluten structure for successful lamination. This strong gluten network traps steam, creating those distinct, airy layers.
- All purpose flour for pizza (and danish dough) can be an acceptable alternative if bread flour is unavailable. However, you’ll notice a slightly less chewy crumb. It lacks the same protein content as bread flour.
- The key difference is that all purpose flour vs self raising flour is crucial to understand. Self-raising flour contains leavening agents that disrupt the controlled rise needed for laminated pastries. It is completely unsuitable for this purpose.
- While 00 flour pizza dough is prized for its fine texture in Neapolitan pizza, its lower protein content doesn’t provide the robust elasticity needed for extensive folding in this recipe. Stick to bread flour for optimal layering.
Yeast is the living agent that gives our dough its lift and airy structure. I often reach for Red Star Quick Rise Instant Yeast for its convenience. It can be mixed directly into the dry ingredients.
In practice, if you have active dry yeast instead of instant yeast, you’ll need an extra step. Simply dissolve it in a portion of the warm milk or water with a pinch of sugar. Let it bloom for five to ten minutes until foamy, then proceed with the recipe. This ensures your yeast is active and ready to work.
- Butter: This is perhaps the most critical ingredient for the signature flakiness. Always use a high-quality, high-fat unsalted butter. European-style butters are excellent. The butter slab must be very cold but pliable enough to flatten without breaking. It provides the crucial separation between dough layers.
Milk or water hydrates the dough, activating the yeast and bringing everything together. I always use room temperature or slightly warm liquid. This helps the yeast start working effectively without shocking it.
Sugar does more than just add sweetness to the final product. It feeds the yeast, encouraging a vigorous rise. Additionally, sugar promotes beautiful golden-brown edges during baking.
Salt is often underestimated but plays several vital roles. It balances the sweetness, enhances flavor, and strengthens the gluten structure. Salt also helps control the yeast’s fermentation, preventing over-proofing.
An egg enriches the dough, contributing to a tender crumb and a richer color. The egg also adds moisture and helps bind the dough during mixing.
Finally, optional flavorings can elevate your danish dough. I love adding a hint of vanilla extract or ground cardamom for classic Scandinavian warmth. These additions provide a subtle aromatic complexity.
Worth noting here, for those exploring alternative diets, the principles of how to make gluten free pizza dough can be adapted for laminated pastries. Specific gluten-free flours, such as Bob’s Mill Gluten Free Flour or Krusteaz Gluten Free Flour, can be utilized. However, detailed guidance on these substitutions will be covered in a separate variations section.
Gearing Up: Essential Equipment for Mastering Your Danish Dough
Here’s the thing: while the quality of your ingredients is paramount, having the right tools makes all the difference. Investing in proper equipment elevates your baking experience. It ensures consistency and simplifies complex processes.
A stand mixer with a dough hook is truly invaluable for this recipe. Kneading by hand is possible but tiring for danish dough recipe. The dough hook attachment effortlessly develops the gluten. This prevents a dense, doughy pizza-like texture in your final pastry.
- Dough Hook: This attachment is ideal for yeast doughs requiring extensive kneading. It pulls and stretches the dough.
- Paddle Attachment: A paddle attachment, in contrast, is typically for softer batters and mixes. Think cake batter or cookie dough. Using the wrong attachment can overwork the dough. It can also strain your mixer. For sturdy doughs, the KitchenAid pizza dough hook is perfect.
A good rolling pin is non-negotiable for lamination. I always prefer a heavy, solid wood dough roller. This allows for even pressure across the dough. It helps create those distinct, buttery layers. An uneven roll can lead to pockets of unlaminated dough. This will affect the flakiness.
- French Rolling Pin: Many bakers, including me, prefer a French-style rolling pin. It has tapered ends for greater control.
- Traditional Rolling Pin: A standard rolling pin with handles also works. Just ensure you apply even pressure.
For baking and chilling, baking sheets lined with parchment paper are essential. Parchment paper prevents sticking. It also makes cleanup a breeze. A common mistake is using freezer paper instead of parchment paper. Freezer paper is coated plastic and not oven-safe. It will melt and ruin your pastry. Think of pizza paper as a good proxy for oven-safe parchment.
You’ll notice that proper chilling is crucial for danish dough. Plastic wrap or a dedicated dough box prevents the dough from drying out. A skin forming on the dough inhibits its ability to rise. It also interferes with lamination. In my kitchen, I sometimes use a simple dough wood bowl covered tightly. This provides a cool, dark environment for proofing.
A small pastry brush is indispensable for applying egg wash. This gives the pastries their signature golden-brown sheen. It also helps with adhering any toppings before baking. The trick is to apply a thin, even layer of wash. This ensures uniform browning without sogginess.
Precision is key in baking, especially with laminated doughs. A reliable kitchen scale is highly recommended. Measuring ingredients by weight, especially flour and butter, ensures accuracy. Cups can vary wildly, but grams are consistent. This consistency directly impacts the texture of your dough.
Finally, a bench scraper is incredibly useful for handling the sticky dough. It helps you cleanly lift and fold the dough. It also aids in portioning. This minimizes the need for excess flour on your workspace. Excess flour can toughen the dough.
Sometimes, for mixing dry ingredients, a wooden whisk feels just right. It adds a traditional touch to the process. These tools, while simple, contribute significantly to mastering this rich pastry.
Your Guide to Flaky Perfection: Step-by-Step Danish Dough Recipe
Welcome to the heart of your danish-making journey! This section guides you through each precise step, transforming simple ingredients into a stunning, flaky pastry. By carefully following these instructions, you’ll achieve those light, airy, and utterly delectable results that define a perfect danish. We’ll focus on the practical application of techniques, ensuring each action builds upon the last to create those signature layers.
1. Activate Yeast & Prepare Dough
Start by combining 1/2 cup of warm milk (around 105-115°F / 40-46°C) with 2 tablespoons of granulated sugar. Stir in 2 1/4 teaspoons of active dry yeast and let it sit for about 5-10 minutes until foamy. This bubbling indicates your yeast is active and ready.
In a large mixing bowl, or the bowl of your stand mixer, whisk together 3 cups of King Arthur Organic Unbleached Bread Flour with 1 teaspoon of fine sea salt. Gradually add the foamy yeast mixture to the flour. Incorporate 1 large egg and 1/4 cup of softened unsalted butter.
Attach the dough hook to your stand mixer and knead on low speed for 8-10 minutes. The dough should become smooth and elastic, pulling cleanly away from the sides of the bowl. If kneading by hand, work the dough on a lightly floured surface until supple and no longer sticky.
2. First Proofing
Lightly oil a clean bowl with a neutral oil, such as vegetable or grapeseed. Place the kneaded dough into the bowl, turning once to coat all sides, then cover tightly with plastic wrap to prevent a skin from forming.
Allow the dough to rise in a warm, draft-free spot until doubled in size, which typically takes 1 to 1.5 hours, depending on your kitchen’s temperature. Over-proofing at this stage can lead to a less structured dough, so stick to the recommended time. Once doubled, gently punch down the dough to release the air. Wrap it tightly in plastic and refrigerate for at least 30 minutes; chilling makes the dough significantly easier to handle for the next steps.
3. Prepare Butter Slab
While your dough chills, prepare the butter for lamination. Take 1 cup (2 sticks) of unsalted butter, cut into 1/2-inch slices. Arrange these slices on a sheet of parchment paper, forming a rough 6x6 inch square. Cover with another sheet of parchment paper.
Using a rolling pin, gently pound and roll the butter until it forms a uniform, pliable 8x8 inch square with an even thickness. This consistency is crucial to prevent the butter from breaking through the dough during lamination. Keep the butter chilled until ready to use, ensuring it is firm but flexible.
4. Enclose the Butter
Remove the chilled dough from the refrigerator. On a lightly floured surface, roll the dough into a roughly 16x8 inch rectangle, striving to keep the edges as straight as possible for even layers.
Place the prepared butter slab squarely in the center of the rolled-out dough. Visually divide your dough into thirds lengthwise. Fold one side of the dough over the butter, then fold the remaining third over that, completely enclosing the butter. Pinch the seams firmly to seal the butter inside, creating a neat package.
5. Lamination (Folding & Chilling)
Now for the magic of lamination! With the seam side down, on a lightly floured surface, gently roll the butter-enclosed dough into a long rectangle, about 18x10 inches. Roll evenly to maintain a consistent thickness, avoiding excessive pressure that could force butter through the dough.
Perform your first single turn (also known as a letter fold): Fold one-third of the dough over the center, then fold the remaining third over that, much like folding a business letter. This creates three layers of dough and two layers of butter.
Wrap the folded dough tightly in plastic wrap and refrigerate for 30-45 minutes. This chilling period is vital, allowing the butter to firm up again and the gluten in the dough to relax, ensuring crisp layers. Repeat this roll, fold, and chill process three more times, for a total of four single turns. After the final fold, chill the dough for at least 1 hour to prepare it for shaping.
6. Final Chill & Shaping
After its final lamination and extended chill, remove the dough from the refrigerator. On a lightly floured surface, roll the danish dough out to your desired thickness, typically about 1/4 inch for most pastries. Lightly dust your surface with bread flour to prevent sticking.
Use a sharp knife or pastry wheel to cut the dough into various shapes. Squares are perfect for fruit-filled pockets, while strips can be twisted for braids, or a rolled rectangle can be sliced to create pinwheels. Trim any uneven edges for a clean finish; these trimmings can be re-rolled once or twice, but be mindful that overworking them can toughen the dough. Arrange your shaped danishes on baking sheets lined with parchment paper, leaving sufficient space for them to expand.
7. Second Proofing
Once your danishes are shaped, they need a final proof. Loosely cover the baking sheets with plastic wrap or a clean kitchen towel to prevent the dough from drying out. Place them in a warm, draft-free spot.
Allow the shaped danishes to rise for approximately 45-60 minutes. They should look visibly puffed and slightly larger, feeling soft and airy to the touch. This crucial proofing ensures a delicate texture after baking; avoid over-proofing, which can lead to a loss of defined layers. Watch for that light, pillowy appearance, indicating they are ready for the oven.
8. Egg Wash & Bake
Preheat your oven to 400°F (200°C) with the rack in the middle position. In a small bowl, whisk together one large egg with a tablespoon of water or milk to create a golden egg wash.
Gently brush the tops of your proofed danishes with the egg wash. This provides a beautiful golden sheen and aids in browning during baking. Be careful not to let the wash drip down the sides, as it can hinder the layers from rising freely.
Bake for 15-20 minutes, or until the pastries are puffed, deeply golden brown, and cooked through. Baking time can vary by oven, so keep an eye out for crispy, flaky edges. An internal temperature of 200-210°F (93-99°C) is a good indicator of doneness. Transfer the baked danishes to a wire rack to cool completely before glazing or filling them.
Achieving Danish Dough Excellence: Expert Pro Tips & Tricks
The secret is in understanding the nuances of the dough itself. Many bakers get discouraged, but a few expert insights can transform your baking journey. I always emphasize mindful execution over rushing the process. This attention to detail makes all the difference.
-
Temperature Control is Paramount: In my kitchen, keeping everything cold is a mantra for this recipe. Both your butter and dough must remain chilled during lamination. If the butter starts to soften, return the dough to the refrigerator immediately. This prevents the butter from melting into the dough layers. Melted butter will yield a less flaky pastry.
-
Gentle, Even Rolling Matters: You’ll notice that consistent, gentle pressure is crucial when rolling. I use a sturdy pizza dough roller to achieve uniform thickness. Avoid tearing the dough at all costs. Overworking the dough can develop too much gluten. This results in a tough, unyielding pastry.
Patience is truly a virtue, especially with proofing this treat. The signs of proper proofing are subtle but important. The dough should look visibly puffed and feel light. It should spring back slowly when gently poked. Under-proofing results in a dense, heavy pastry. Over-proofing can lead to a slack dough that collapses in the oven. For insights on managing dough fermentation, refer to this detailed guide on understanding dough proofing.
- Troubleshooting Proofing: If your dough isn’t rising, first check your yeast viability. Ensure your water temperature was correct during activation. Also, avoid cold drafts during the proofing stage. I find that placing the dough in a slightly warm, draft-free spot helps. Knowing “how long can you let dough rise at room temperature” for danish dough is about observation. It is not about a rigid timer.
Quality ingredients can significantly elevate the final product. Trust me on this one. Using a high-fat, European-style butter lends superior flavor and flakiness. Similarly, a strong, unbleached flour makes a big impact. I always reach for King Arthur organic unbleached bread flour. It provides the necessary gluten structure for distinct layers. Using the right flour is a foundational step.
-
Lamination Troubleshooting: Occasionally, butter might break through the dough during rolling. A common mistake is to panic and try to force it. The trick is to dust the area lightly with flour. Then, gently patch it with a small piece of dough. This process is akin to “what does it mean to blend in cooking” for ingredients. It is about seamlessly integrating components.
-
Strategic Chilling is Essential: Adequate chilling time between each fold is non-negotiable. This allows the gluten to relax. It also re-solidifies the butter layers. Skipping this step leads to dough shrinkage. It also prevents those distinct, beautiful layers from forming. I always allocate ample time for chilling.
Enjoyed this recipe? Share it with a friend or save it to your board for later. Leave a comment below — I love hearing how it turned out!
You May Also Enjoy

You Might Also Love These 🍽️
Recipes picked just for you based on what you’re cooking